Sunday, March 27, 2011

Homemade artichoke ravioli

After all this posting frenzy by David, I felt compelled to give my modest contribution... just one recipe - for now! Ravioli are actually not that difficult to make, just a bit time-consuming (but totally worth it!). The preparation is quicker if you have a pasta machine, but if you don't, this give you an idea of how to roll the pasta by hand.

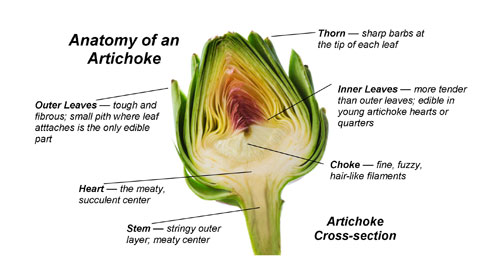
This time I decided to make an artichoke filling.

This recipe will serve 2-3 people (and it took me about an hour and a half from start to end).


For the filling I used:
4 artichokes (the smaller, the better, and with tight leaves)
some onion, diced
2 generous tbsp of ricotta
salt, pepper
~~~~~~~~~~~~~~

First, I removed the outermost and thicker leaves and cut off the top of each artichoke, then I cut them in 2 and removed the choke (which will not be there if you use small artichokes).
I dropped them in water with lemon juice to prevent them from turning black.
Then I sliced them, and sauteed them together with the onion, some white wine, salt and pepper until tender.


At that point, I pureed the artichokes with the ricotta to obtain a relatively smooth cream.


For the dough you'll need :
200 g all-purpose flour
2 eggs (better if at room temperature)
a little water
~~~~~~~~~~~~~~~~~~~~~~~~~~~~~~~

You have to make a well in the flour, add the eggs and mix them into the flour with a fork until they are completely blended.
When the dough becomes more consistent, knead the mixture with your hands until it is completely homogeneous. If too dry, add some water, if too sticky add some flour.
"A good dough should never stick to your fingers!" says the instruction booklet of my pasta machine.


And now, the rolling out!
~~~~~~~~~~~~~~~~~~~

Cut out a piece of dough and cover the rest with a wet cloth.
Roll out the dough on setting number 1 of a pasta machine, three times, folding in thirds between each roll. Then roll through settings 2-9.


Try to match the pasta sheets as closely as possible by size.
Drop spoonfuls of filling on one sheet, leaving at least 1 1/2" between them. place another sheet on top and carefully press out the air around each mound.
Seal and cut between the ravioli (with a knife or a pasta cutter), then place them on a floured plate or sheet. Apparently it's better not to refrigerate them.
Repeat with each dough section until you're out of filling.


Cook the ravioli for 5-6 min in abundant, salted water. Since they are delicate, it's better to use a slotted spoon to remove them into a colander once they're ready.
You can serve them with butter, brown butter and sage, or a light tomato sauce. And parmesan, if you like it.


PS: I also tried a butternut squash filling for Thanksgiving, which was much appreciated!

Cardamartha

So I am not sure about you, but I don't really understand the whole cupcake fad. Don't get me wrong, cupcakes are great and all, but I often find that the mountain of frosting is just a bit much for me. The question is, why is there not a cookie fad? TV shows, food carts, hundreds of little shops opening up, all just about cookies? They are equally capable of incorporating a variety of different flavors. Following this thought, I started with the regular martha and then developed the spicy martha. Now, introducing the cardamartha! Cardamartha is just the basic recipe + cardamom.

Cardamom is great! Look:


In order to get the cardamom flavor into the cookie, I took two routes. First, I melted the butter separately from the chocolate and let it hang out with several while cardamom pods:


After a bit I removed the pods and then incorporated the chocolate and followed along with the rest of the recipe as usual. I think the next time I might even want to dry roast the pods a little before adding the butter.

Then after laying out the dough on the cookie sheet, I split open a few pods to get at the seeds which I then sprinkled on top of the cookies before putting them in the oven:


Unfortunately, the cookies got a little toasted, I think because I put them on the bottom rack of the oven. But they were still pretty delicious after scraping a bit of the bottom off.

Shakshouka

In preparation for my upcoming trip to Egypt I decided to look up some info on Egyptian cuisine. The dish that immediately caught my eye was shakshouka. Shakshouka seems to have originated in Tunisia but is popular throughout the Middle East, including Morocco, Egypt, and Israel. But the real reason I decided to make it was that it called for 6 eggs, allowing me to use up my egg farm share. Shakshouka = "a mixture" in Tamazight (a local language of North Africa according to Wikipedia) and is basically eggs poached in a spicy tomato sauce.

Here I followed a recipe I found on the blog smitten kitchen, which has some great pictures.

Ingredients
1 onion
several cloves of garlic
2 poblano peppers
3 jalapeño peppers
1 tbsp paprika
1 tsp cumin
28 oz can of whole pealed tomatoes
6 eggs
flat parsley
feta

1) Sauté the chopped onion, garlic, and peppers in olive oil until nice and soft.

2) Add the paprika and cumin and fry for about a minute longer.

3) While all this going on, put the tomatoes along with their liquid into a large bowl and squeeze until they are broken up as well as you can. This is the fun part.

4) Add the tomatoes and about half a cup of water. Simmer for about 10 until some of the liquid has reduced and everything
looks nice and ready. Salt to taste.

5) Poach the eggs in the tomato sauce. Do this by cracking the eggs and gently dropping into the tomato mixture, placing them uniformly around the pot like so:


6) Allow to simmer for a few minutes until it looks like the yolks are firming up a bit.

7) Carefully baste the egg whites with the liquid from the sauce until everything looks good.

8) Top with feta and the chopped parsley. I used quite a bit of both, and it was delicious!


9) Serve with toast or warm pita bread.

Saturday, March 26, 2011

Chole Palak

Yesterday was my second shipment from the CSA (woo hoo another dozen eggs!!).


This time it included a whole bunch of spinach so I thought it'd be good to do something with it right away. Chole = chic peas, palak = spinach (not that I speak Hindi though...). I feel like at this point if you've read any of the past posts here, that is about all I need to say to explain the recipe. But just in case there are any late night bacon fans out there, I will go into the details.

One thing to note is that there can be quite a bit of variety on which aromatics and which spices you use. This time I only had some garlic and hot pepper (no onions or ginger) so I did without. I also skipped the usual curry leaves, and opted for some cumin seeds and the usual powdered spices. Here is more or less how it happened:


I also decided to experiment with the beets I got. I tried treating them like potatoes. Peeled, cubed, cumin seed fried with ghee, then some garlic and hot pepper. My roommate said the sweetness of the beets was rather in conflict with the heat and saltiness that I introduced, but I enjoyed it. Don't typecast the beets.


And now for listener mailbag!! Some good friends in Chicago made their own rendition of aloo saag (using spinach here rather than swiss chard which is a bit more proper), and it looked pretty delicious! Thanks guys!

Wednesday, March 23, 2011

Too Many Eggs Curry

So part of signing up for a CSA is that you have to cook with whatever you get. Mine currently includes a dozen eggs every two weeks, which is almost a dozen more eggs than I usually cook with. So how about egg curry?! I've seen this before, but never tried it. Not sure I got it quite right, but it wasn't bad.

This follows more or less the standard procedure:

0) Hard boil a few eggs (I had 3 of them left), cool, peel, and cut in half.

1) Fry 1 tsp black mustard seeds, 2 tsp cumin seeds, several curry leaves in 1 tbsp of ghee.

2) When the seeds start to pop, add in your minced garlic, ginger, and hot pepper, frying for a couple of minutes.

3) Toss in 3 medium-sized tomatoes, chopped, and some salt. Cover for a few minutes, letting the tomatoes cook down.

4) Mix in powdered spices and fry for another minute: 1 tsp turmeric, 1 tsp chile powder, 1 tbsp cumin powder.

5) Pour in about 1/2 a cup of coconut milk (I actually put in about twice this much which was probably a bit too much) and simmer for about a minute.

6) Throw in the sliced eggs and simmer for another, then serve on rice! I think the next time I make this I'll add in some potatoes to make it a bit more hearty.

Sunday, March 20, 2011

Paneer Biryani + Spicy Martha

Paneer Biryani
I had a bunch of leftover rice from the other day and thought it would be a good time to make some biryani. I had only ever made shrimp biryani, but thought I would keep up with the vegetarian theme, and do some paneer biryani.

Use: 14 oz package of store-bought paneer
Do: Sauté the paneer cubes in 1 tbsp of ghee (or butter or canola oil). Once they start to brown, remove with a fork or slotted spoon, leave as much of the ghee or oil behind in the pan.


Use: 2 tsp cumin seeds, 1 tsp coriander seeds, several curry leaves
Do: Fry in the remaining ghee, adding more if needed.

Use: 1 medium onion, several cloves of garlic, several hot peppers, a hunk of ginger, all finely chopped.
Do: Add the aromatics once the seeds start of pop. Toss in a bit of salt, cover, and fry until the onions are soft.

Use: 1 tsp turmeric powder, 2 tsp chile powder, 1 tbsp cumin powder, 0.5 tbsp coriander powder
Do: Mix in the powdered spices and fry for another minute.

Use: 3 medium-sized tomatoes
Do: Toss in the chopped tomatoes, a bit of salt, and cover, allowing the tomatoes to cook down.

Use: 2 handfuls raw cashews, 1 handful raisins, about 0.5 cups of plain yogurt.
Do: Incorporate the cashews, raisins, and yogurt, and cook for a minute or two.

Use: 2 cups of cooked rice
Do: Incorporate the cooked rice into the mixture. Once it is fully mixed, and the paneer, stirring gently to avoid breaking up the paneer. Enjoy!


Spicy Martha
I decided to make a slight modification to the super chocolate cookies I made the other week by adding a bit of pasilla chile pepper and topping with a bit of cayenne.

The pasilla comes dried, so the first step is to reconstitute by soaking in water. Once they seem nice and soft, dry them off a bit and then chop.


I basically just incorporated the chopped pasilla into the melting butter and chocolate stage of the original recipe. Here is a visual version:

Thursday, March 17, 2011

St. Patty's Day Aloo Saag

I didn't wear anything green today, and biking home in Boston, it seems that I may have been the only one. I decided to remedy this oversight, not by drinking green beer, but by eating something green and spicy. No hangovers here. Food coma? A little bit.

Aloo = potato, saag = greens. Another name for greens is palak, so sometimes this dish might be called aloo palak. Maybe one of the two more specifically implies spinach, which is what I would normally use to make this dish. When I got to the grocery store however, the swiss chard was difficult to pass by, so I decided to make a substitution.

I was also thinking that it would be nice to cook something a bit faster, so I kept track of the time as I went along. Here is the play by play:

7:18 pm
The ingredients have been assembled and I begin to chop the first set of items. I believe we can call these aromatics: a hunk of ginger, a few cloves of garlic, 1 onion, several green chile peppers.


7:23 pm
Heating a wide, deep pan, I drop in 2 tbsp of ghee, 2 tsp coriander seeds, and several curry leaves, frying until I hear a nice pop from the seeds.


7:24 pm
I let the aromatics sweat - meaning, I threw in the chopped onion, ginger, garlic, hot pepper, a little bit of salt, and covered to help things along. While things were sweating, I peeled 2 medium potatoes, and cut them into french fry-shaped chunks.

7:29 pm
I added the powdered spices (1 tsp turmeric, 2 tsp chile powder, 1 Tbsp cumin powder) and fried for another minute.

7:30 pm
Now I added the potatoes and a bit of salt. I fried the potatoes until they are just tender, adding a little bit of water as needed (I used some of the liquid whey left over from making the paneer the other day). While the potatoes were moving along, I washed and chopped the swiss chard.

7:40 pm
The potatoes are ready, adding the swiss chard. Covered, for a few minutes, stirring and adding a bit more salt.

7:45 pm
Heated up the leftover rice and the leftover paneer mushroom makhani.

7:50 pm
Eat!

Wednesday, March 16, 2011

Paneer Mushroom Mahkani

Tomorrow there is a lunch pot luck at work, so I thought I'd make something interesting to bring in. A while back I made some Murgh Makhani, but I thought I would do a vegetarian version, especially for those worried about eating foods that could empathize with you.

This dish takes quite a while, so makes sure you've got time. I made the paneer the night before since they were out of already-made paneer at the store. Here is what I used:

Paneer made from 1 gallon of milk
10-12 crimini mushrooms, quartered.

For the marinade:
2 Tbsp plain yogurt
2 tsp chile powder
1 Tbsp garam masala
3 cloves garlic, minced
1 Tbsp minced ginger
1 Tbsp melted butter
salt

For the gravy:
2 tsp cumin seed
several curry leaves

1 onion
4 cloves garlic
1 Tbsp minced ginger
2-3 chile peppers

1-2 tsp turmeric powder
1 Tbsp cumin powder
1 Tbsp coriander powder

3 large tomatoes
2 handfuls of raw cashews (pre-soaked in water)


Fry the cubed paneer pieces in ghee or butter until lightly browned. Set aside and then do the same for the mushrooms. I am not sure how much the paneer and mushrooms needed to be marinated, but thought I'd do it anyway. I think next time I will skip this step and see how things change. Here, I combined all the marinade ingredients with the paneer and mushrooms and set aside for 20 minutes. Meanwhile I prepared the remaining ingredients. Before starting the gravy, I took the marinated paneer and mushrooms, and cooked them a bit more in the marinade to impart more flavor and cook down the liquid. Again, I think next time around I will just skip this part. I set aside the mushrooms and panner and then started the gravy.

Melt half a stick of butter in a wide, deep pan. Add the curry leaves and cumin seed and fry until the seeds start to pop. Toss in the onion, garlic, ginger, and chile pepper, and fry until the onions are nice and soft. Toss in the powdered spices, and fry for a bit longer. Next add the tomatoes and a bit of salt. While the tomatoes are getting started, grind the cashews along with some of their soaking water in a food processor or blender, to make a smooth paste. Add this to the pot with the stewing tomatoes. Add a few Tbsp of yogurt here to make things a bit more creamy. Once the tomatoes are cooked down a bit, remove from the heat, and carefully add to a food processor and blend until smooth.

Return the blended gravy to the pan, along with some water if the sauce is too thick at this point. Toss in the paneer and mushrooms, and simmer for a few minutes, adjusting salt and other spices as desired. Now you are ready! Serve topped with freshly chopped cilantro, and with rice or bread. Enjoy!

Friday, March 11, 2011

Banana is Anna for Banchan

It is finally time to write the story of banchan. I have two visitors coming, and one of them definitely likes banchan. They are almost here. The cooking is done. I better write fast!

Banchan is actually ma po tofu. This is a vegetarian version that actually has almost nothing to do with actual ma po tofu, which usually is with ground pork and has Szechuan pepper. This version was taken a very long time ago from a cookbook on Chinese cooking written in Japanese that el Ponja translated since he can read Japanese. One of the essential ingredients in ma po tofu is a black bean chile paste called tobanjan. El Ponja has several cats back in Japan, one of which is named Banchan (aka Antonio Banderas). Now for some reason, in my head ma po tofu, tobanjan, and banchan were all swimming about indistinguishably. So after we made the first, in what came to be several, batches of ma po tofu, I was reminiscing about how good it was, and said, "mmmm that banchan was good, we should make some more." And henceforth, ma po tofu is Banchan. Maybe this is only interesting because of how much banchan we ate back then.

Here is what is needed:
1 clove garlic, minced.
150g or 1/2 package of Quorn ground beef style meat substitute


1-3 Tbsp Tobanjan. The original recipe calls for Lan Chi brand, but this has been difficult to find at times. I just found it again at one of the Boston Whole Foods though!


1 cup boiling water (have ready to go in advance)
1 package of Extra Firm Silken Tofu, cubed
1 tsp sugar
1.5 Tbsp soy sauce
1 Tbsp cooking wine

1-2 scallions, finely chopped
1-2 Tbsp Potato starch, dissolved in half a cup of cold water


Heat a wok or broad, deep skillet until it starts to smoke. Add a few Tbsp of the cooking oil of your choice, then the minced garlic and the Quorn. Cook on high heat for several minutes, browning the Quorn. Add the tobanjan and stir.

Next add the 1 cup of boiling water, cubed tofu, soy sauce, cooking wine, and sugar. While everyone is getting to know each other in the pot, you can mince the scallions. Add the scallions to the top of the pot, without stirring, letting them cook in the steam.


The last step is to take the the dissolved potato starch and slowly add to the mixture. Do this in three batches to prevent clumping. The potato starch serves to thicken the sauce, and you can add as much or as little as you like. Your banchan is now ready to serve! I prefer it over sushi rice. Not sure why, but I find it goes best with beer from a can.

Thursday, March 10, 2011

CSA'ing

No cooking was done tonight, but that didn't stop me from getting more ingredients! I just got my first farm share from the CSA I joined. CSA = Community Supported Agriculture. If you don't know about it already, the way it works is that you basically sign up to receive a regular supply of vegetables from a local farm, paying a big chunk of it in advance. This helps the farmer with their cash flow, and allows you to have a closer relationship with the people from whom you buy your food. Each week (or every other week) you get a box of whatever veggies are in season, so you have to figure out what to make with what you get. I signed up for a 7-week spring share with Rockville Market Farm, located in Starksboro, VT. Every other week I can pick up my shipment at the grocery store by my apartment from some friendly folks that work on the farm. Since there are not a whole lot of veggies in season in Massachusetts right now, they send some greenhouse crops along with some locally sourced produce like eggs, cheese, and bread. Today I got some potatoes, carrots, turnips, beets, and onions along with some goat cheese, eggs, and a big loaf of bread! I don't think I've ever cooked with turnips or beets before, so it will force me to try something new! Whatever that is, I will try to post it here!

Wednesday, March 9, 2011

Martha's Chocolate Chocolate Cookies

Well, I am still on a cooking streak, but tonight I had plenty of leftovers, so I decided to make some dessert. Dessert is spelled with 2 s'es because unlike desert, which has 1 s, you would like to go through dessert twice. At least that is what I was told!

This is based on a recipe, but it is firmly stored in my head. I didn't look it up. This is what I am trying to do here. The recipe belongs to Martha Stewart, who it turns out, knows what she is talking about when it comes to cookies.

I happen to recall the recipe because I made it several times on the occasion of my last trip to Florida. I made here a half-recipe since it is a bit dangerous to have these sitting around. It makes about 6 or 7 cookies.

Pre-heat the oven to 350 F.

1/2 cup flour, 1/4 cup cocoa powder, a pinch of salt, a pinch of baking soda


1 egg beaten together with 3/4 cup of sugar


75 g chocolate (I went with 72% Green and Black's Organic Baking Chocolate), melted in a double boiler with 1/2 stick of unsalted butter


Mix the melted butter and chocolate with the beaten egg and sugar


Mix the butter, chocolate, egg, sugar mixture with the flour mixture, adding about as many chocolate chips are you feel like!


Use a spoon to lay out the dough on a cookie sheet lined with parchment paper. Sprinkle the cookies with sea salt (Martha didn't know about that!)


Bake for about 12-13 minutes at 350 F, let cool, enjoy!

Tuesday, March 8, 2011

Aloo Gobi

The great thing about cooking indian food everyday is that is that you can always have one or two curries leftover from the previous days and make your own little indian buffet! Today the cauliflower was calling out to me, so I decided to make some Aloo Gobi. Aloo = potato, gobi = cauliflower. That pretty much sums it up.

I stopped by the store to pick up some Ghee instead of using olive oil. Ghee has a great, rich dairy smell when you are frying the garlic and spices. As it should, it is 100% Pure COW!


In addition to the pure cow, I had the following on hand, listed in the order in which they are added to the pot:

step 1:
several curry leaves
2 teaspoons cumin seeds
1 teaspoon coriander seeds

step 2:
4 cloves garlic
1 thumb-sized piece of ginger, minced
4-5 hot chiles

step 3:
1-2 teaspoons turmeric

step 4:
4-5 small potatoes, cubed
1 small head of cauliflower, cut into bite-sized pieces
salt

step 5;
tomato
salt

step 6:
cilantro
lemon

Heat 1-2 tablespoons of Ghee, and add the cumin seed, coriander seed, and curry leaves. Fry until the seeds start to brown/pop, then add the minced garlic, ginger, and hot pepper. Fry these for a good minute or two before adding the turmeric. Fry the spice mixture for just a bit then add the potato and cauliflower. Add a bit of salt, adjust the heat (if it is too dry maybe add a bit more ghee), and cook covered until the potato and cauliflower are not quite done. At this point you can add the chopped tomato and more salt if needed (taste it!) and cook until the potato and cauliflower are nice and tender, but not mushy. Top off with some lemon and chopped cilantro! I added some leftover rajma and ate it up with some more flat bread. Enjoy!

Monday, March 7, 2011

Rajmahal

Um... hello? Is anyone still out there? Well, I've decided to get this thing back up and running after a ridiculously long break. I mean the last post that I contributed was almost two years ago. Crazy! A lot has happened since then, but it is the move to Boston that made me decide to start writing here again. My new place in Central Square, Cambridge is literally a two minute walk to the Harvest Coop grocery store and an Indian market, making them both practically an extension of my kitchen. That said, I'd like to cook something new as close to every night as possible. We'll see how long it lasts, but the plan is also not to rely on any recipes and just come up with stuff based on what is already in my head. Part of how this works is that I walk into the grocery store and check out what vegetables look good, go into a trance-like state while I ponder possible combinations, apologize for blocking the aisle while in said trance-like state, and then come home and cook.

Rajma. By the way, being that I am right next to the Indian market, most of these are going to be Indian dishes. I should also say that, since I am making most of this up, the dishes are likely to be a bit removed from the standard formula. I would say that any piece of seemingly factual information provided here is highly suspect, so proceed with a pinch of salt. Rajma is an Indian curry centered around red kidney beans. For some reason I also think it would like to include some paneer. Here are the ingredients:

olive oil (ghee is better, but I forgot to buy it!)
several curry leaves
1-2 teaspoons cumin seeds

4 cloves garlic
1 thumb-sized piece of ginger, finely chopped
4-5 hot green chiles

6oz paneer (homemade or from the store)
3 medium-sized tomatoes, chopped
15oz can of red kidney beans (dried would be better, but that requires forethought)

salt to taste
cilantro
lemon

Start out by heating some oil in a wide pan and add the curry leaves and cumin seeds. The smell of curry leaves by the way is one of my favorite smells ever. If you can find some, I highly recommend. If you can't get them, you can still make the dish without them, but that is sad. Another side note. I am trying to make the Indian dishes with a minimum number of different spices to see what the base of flavor really is for each dish.

Once the cumin seeds start to pop, throw in the cubed paneer, allowing it to brown on one side. When it seems like a good time to do so, toss in the chopped tomato and salt. I had always thought that before adding the tomato you should take out the paneer and set aside until the end. I didn't feel like doing it here though, and it came out great all the same.

Allow the tomato to cook down into a nice sauce, smashing down the tomato bits with a wooden spoon to help things along. Once things look to be at the desired level of sauciness, add in the kidney beans, which have been removed from their can and rinsed. Stir the beans around to incorporate into the sauce, adding additional salt if needed. Finally top off with a good amount of chopped cilantro and juice from about half a lemon. The lemon and the cilantro really made the dish come together nicely! Rather than serving with rice, I enjoyed my meal with some Indian flat bread (methi paratha) from the Indian market!