We had some chickpeas that were being neglected, so I figured how about some chana masala (also called chole masala)? We used dried chickpeas, which you must soak for several hours and then cook for a few hours more. Or you could use canned chickpeas, which you open with the can opener, rinse and then you are good to go. This may make you wonder why you would ever want to use dried beans. After a bit of searching here are the pros and cons for each:
Dried Beans
pros: cheaper, more varieties available dried, no metal can = less waste, often have less sodium, no bisphenol-A (used in the lining of many cans and may be harmful to humans), can season while cooking, have a firmer texture, and some say better taste.
cons: take a long time to prepare, you need to soak the beans to rehydrate them (look here for more soaking and cooking info).
Canned Beans
pros: quick and easy.
cons: some chemicals may leech from the can into the beans, sometimes high sodium, may not taste as good.
So maybe dried is the way to go unless you are doing something last minute.
On to the chana! Here is the plan.
2 cups cooked chickpeas
1 tablespoon cumin seeds
1 tablespoon black mustard seed
1 large onion (chopped)
2-4 cloves garlic
1 finger-length piece of ginger
hot peppers (at your discretion)
4 large tomatoes
1 teaspoon cumin powder
1 tablespoon coriander powder
2 teaspoons turmeric
1 tablespoon garam masala
1-2 bell peppers
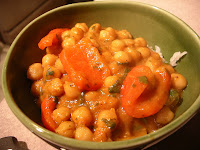
Fry up the cumin and mustard seeds till they start to pop. Add the onion, garlic, ginger, and hot pepper and cook till the onions seem satisfied. Add the powdered spices and stir up a bit. Toss in the tomatoes and salt. Cook until the tomatoes reduce to a sauce (you can mash 'em up with your cooking spoon to speed things along). Lately I really like throwing things in the blender to make a smooth sauce, so if that floats your boat now would be the time to do it. After blending or not blending you can add the chickpeas and some water if you need to adjust the consistency of the sauce. You can also add some bell peppers at this point and let it simmer. You could also do it with potatoes and you get aloo chole. When we made this last night, I think we got a little carried away with the hot peppers (at least 10 hot thai peppers). I recommend not going this route even if you like spicy, as it was a little in your face. Here is what it looked like when we finished:
Saturday, February 28, 2009
Friday, February 27, 2009
Spicy Chuuna
Hola. We did a slight twist on a perennial favorite, spicy tuna pasta.
Without further ado, on to the steps and pics!
Slice up tomatoes and garlic.
Spicy requires capsaicin. So chop up some hot peppers, like so.
Starting with olive oil and garlic, add the hot peppers, and fry for a short bit until properly aromatized but, as usual, not burnt. Add the tomatoes. Add salt (to really get the good tomato flavor you need to not be timid at this juncture). Add a can of tuna (aka, chuuna according to him). Usually we'd use some oregano but, for some reason, we tried it with fresh cilantro this time around. Long story short, the sauce will look like this.
Mmmm. Looks even better with twisty gemelli pasta.
Enjoy!
Saag it to me
A few nights ago (the same night we made the paneer), we made some delicious palak (or saag) paneer. Indian food is probably my favorite kind of food, but it can be a bit labor intensive. An Indian friend of mine once told me that if Indians spent half as much time thinking about how to develop their country as they do in the kitchen, India would be the richest country in the world. That said, if you've already made the paneer or bought some ready-made in the store, this is a relative easy dish to make. Here is how it works.
First see if you have all the ingredients (you can get all the spices in most grocery stores):
1 tablespoon black mustard seed
1 tablespoon cumin seed
1 large onion (chopped)
4-5 cloves garlic (or more if you are into that kind of thing)
1 finger-length piece of ginger (finely chopped or grated)
1-2 hot chili peppers (or as many as you can take)
1 tablespoon cumin powder
1 teaspoon paprika
1.5 tablespoons coriander powder
2 teaspoons turmeric powder
2 tablespoons garam masala
fresh spinach (1 bunch/large bag, hard to have too much)
cream or cream cheese (to give some extra creaminess at the end)
And then?
Most Indian recipes call for ghee (clarified butter), but I usually just use butter or olive oil or sometimes a little of both. Heat some oil and/or butter in a broad pan and add the black mustard and cumin seeds. Fry until the mustard seeds start to pop or turn grey. Next add the onion, garlic, ginger, and hot peppers. Saute until the onions are translucent. Now add the powdered spices (cumin, paprika, corriander, and tumeric). I don't usually measure how much of these I put in, but the measures I listed are my best guess. Stir them up with the oniony mixture and let it fry a bit more (if you need, add more oil). This might be a good time to add some salt as well. I usually add a bit when I am doing the onions and then a bit just before I add the spinach, why? Who knows! Add the spinach and cook covered for a few minutes. Once the spinach is cooked, remove from the heat and carefully pour your concotion into a blender or food processor and blend until smooth. Pour this back into the pan and add water (or leftover whey from making the paneer) until you get the level of thickness that seems appealing to you. Add the paneer, garam masala, the cream or cream cheese (to your desired level of creaminess) and you are good to go! Top with chopped cilantro (or don't) and serve over rice or with some kind of flat bread like chapati or naan.
Thursday, February 26, 2009
Ragu della Mamma
Howdy folks. We tackled one of the classics, ragu, lightly adapting my momma's recipe. Here's a picture of the completed deliciousness.
We did use real meat, beef, in fact, but it's from the good people at Heartland Farms. Very good.
Okay here's the procedure.
Sauté about 3/4 lbs of ground beef in two tbsp of olive oil until the beef gets "poro poro," Japanese onomatopoeia for crumbly (and in this case browned). Add a bit of red (or white) wine (50cc or so) and evaporate. Put in garlic (2-3 cloves), half an onion (not sliced) and bell peppers (cut in half). Add half a liter of strained tomatoes and a bit o' water. (Note: We tried to put fresh tomatoes in a blender and use that but the resulting slurry was too liquid-y and not tomato-y enough. So we added some tomato paste.) Add salt and fresh basil (2 stems). Once that comes to a boil, turn the heat down to low and let simmer for 30-40 minutes. When the onion and bell peppers become soft, it's done. Pour the sauce onto freshly boiled al dente pasta (we used medium sized shells), add some parmesan or pecorino, and you're done.
Here's where you can make some olio santo for some spice. Heat up a good amount of olive oil. Once the oil is hot, add freshly chopped hot peppers and salt and take the pan off of the fire. Let the peppers change color but not burn. Voilá!
Paneer so Fresh it Tastes Homemade
Camembert? Non! Much easier to make than camembert, or probably any other cheese for that matter, paneer is the simple and tasty cheese found in many Indian dishes. All you need to make it is whole milk and some kind of food acid (lemon juice, vinegar, or left over whey from a previous batch of paneer). For this reason paneer is refered to as an "acid-set" cheese. Other, more familiar cheeses, are typically made from rennet (traditionally made from cow stomach) and therefore called rennet-set cheeses. We made some paneer the other night. Here's how you might do it in the comfort of your own home:
Pour some whole milk (we used a half gallon) into a large (preferably thick bottomed) pot and slowly bring to a boil.
The milk will burn on the bottom of the pot if you don't stir regularly or if the heat is too high. So look out!
As the milk comes to a boil it will start to rise rather quickly and will overflow if you don't quickly remove it from the heat. At this point you add the acid (I like to use vinegar) and stir slowly. How much acid you add depends on the quantity of milk used. For half a gallon, I probably use a few tablespoons. Add it slowly while stirring and once you see the curds (the solid part) separate from the whey (the liquid part), you know you've added enough acid.
Continue stirring and press the solid curds to one side of the pot. Now you can strain the curds using a fine mesh or a cheese cloth. This is what you should be seeing:
I usually save the whey to use in place of water the next time I make rice. It gives it a tasty, slightly milky flavor.
Now we need to drain the remaining liquid from the curd. I like to take two identical containers (usually round and not too large) and place the curd in one, and the second on top of it, pressing to force out the liquid. Then you can place something heavy on top of the whole thing to press it down longer. Occasionally pour out the liquid that has collected. I like to let it sit at least 2 or 3 hours before using it. The longer you press it, the less crumbly, more solid, it will be. Now you are ready to use it however you like.
When I put it in a curry, I like to fry it in some oil or butter with some spices first. Here is how much we made from half a gallon of milk and how it looks as part of the delicious palak (or saag) paneer we made:
Just found a cool website about cheese-making, maybe we'll try to make some other kinds of cheese in the near future:
http://biology.clc.uc.edu/Fankhauser/Cheese/Cheese.html
Subscribe to:
Posts (Atom)